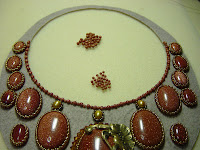
Well, as far as beading new projects, I have one in the works but it keeps stalling. It's one of those projects that don't flow very well. I started the center piece about 2 months ago, then I had a block... if there's such a thing as 'beaders' block' I had it with this piece. I put it in my WIP drawer - Work In Progress- and forgot about it until last weekend when I was inspired to work on it a little more. Well, I'm almost finished with it and the clasp is giving me fits! I'll figure it out... eventually!
I haven't made any progress on my contest piece because I'm waiting on components that are supposed to arrive on Tuesday. So I'll be working on my other project until then.
Now for the great news! Last year I participated in a charity beading challenge for Beading For A Cure. One buys a kit of beads for $25.00. Everyone who participates gets the very same kit. There are certain rules that must be followed but the whole idea is to make something special and unique fro the beads in the kit. My entry for this years challenge I named Grecian Mosaic and it is up for auction on eBay this week. Please check it out and bid on it if you can. This is for a very good cause. The money from these auctions will go to the National Colorectal Cancer Research Association in honor of Layne Shilling, who lost her battle with colorectal cancer in November 2002. You can learn more about this cause at the Beading For A Cure website by clicking on this link: http://www.beadingforacure.org/about.html
Please check out my auction and others in this challenge. Here's the link to my auction:
Grecian Mosaic Cuff 2008 Beading For A Cure entry by Louisa Meece of Beaded Extravagance

 I added more of those same beads to the pearls later to create depth and texture. I then began the task of adding rounds of beads around each cab. The first row being the Galvanized Copper Delicas and then the Gold Luster Rocailles. Where space allowed me, I added 3 more rows of the Galvanized Copper Delicas.


 Last, but not least on my list, is my contest piece. I finally settled on the name and have decided to call it The Martian Queen's Necklace. I recently watched Ray Bradbury's Martian Chronicles and I guess I still had Mars on the brain when I came up with the concept for the piece. So far, I have spent 6 hours on it. I try to spend about 2 hours a day working on it. It will take me a while to complete it and I don't want to get burned out working on it too much. Besides that, I need time to work on my other commission piece and items for my stores too. (I've become very adept at this time management thing here lately!) This week I received the rest of the components I needed to start on the piece and started by planning and carefully measuring where all the cabs would be placed. O don't follow any scientific method, but my method seems to have worked because everything seems fairly symmetric...so far. We'll see how well I did once I start beading in the gaps.


