Sunday, March 29, 2009

Been Busy...

Hello All! I know that this blog is coming late but I've been a very busy beader!

The first order of business was to make a gift that my sister requested for our cousin Claudia in Madeira, Portugal for her birthday and graduation. I don't want to say much more about it just in case Claudia decides to check my blog and I spoil the surprise! So she'll just have to wait and see when she gets it!

I also spent some time working on my ohter commission. It's been giving me headaches! I ended up ripping out about 3 hours of work because it didn't match up. I decided to set it aside and concentrate on my FMG contest piece.

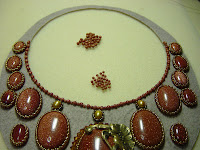
The countdown has begun. I have 12 days left before I have to ship photographs of the piece to FMG in Oregan. After 22 hours of beading, I am FINALLY almost halfway finished!

When I last blogged about this piece, I had just begun bezeling the cabs. The base row consisting of galvanized Copper Delicas topped with size 15 Gold Luster Rocailles in a peyote stitch. I had to make sure that my base row of copper beads was an even count so that my peyote stitch would work out. This is no easy feat because cabs don't care how we decorate them! You either have too many beads or too few beads so there's a lot of juggling involved.


Next I bezeled the pearls with the Gold Luster Rocalles and Dark Copper Rocailles. I was trying to bring out more of the oxidation in the brass stamp with the Dark Copper Rocailles and I think it may have worked ok.

I added more of those same beads to the pearls later to create depth and texture. I then began the task of adding rounds of beads around each cab. The first row being the Galvanized Copper Delicas and then the Gold Luster Rocailles. Where space allowed me, I added 3 more rows of the Galvanized Copper Delicas.


I also added a row of 2mm & 3mm Brown Goldstone beads to the inside of the collar. The original plan was to use heishi and gold beads but it just wasn't sitting right with me. So out came the seam ripper (for the hundredth time this week it seemed!) and the heishi beads were gone. I like this look a lot better!

I then realized, before I do any more rounds that I had better start working on an outside edge befor things got too close to the edge. I used a Dark Copper Rocaille and 2 Gold Luster Rocailles and slanted them upwards along the outside edge. I also added a picot stitch around the pearls with the Gold Luster Rocailles.

Then I set to working on filling in the rest of the right side with rounds of the Copper and Gold beads. The unbeaded spaces are meant to be cut outs. The concept drawing had a lot more cut out and they were larger, but not everything works out like we have imagined and drawn it! So this is where I am with this project. Next- the left side! Until next time...

Friday, March 20, 2009

Kicking it into High Gear!

Well, I'm beading like crazy this week. My components finally came in on Tuesday and I was finally able to make some progress on the projects I have lined up on my desk.

The first item on the list was a beach themed bracelet for my cousin Judy in South Africa. I had made a similar bracelet using charms I had collected on vacations over the years. She saw a picture of it commissioned me to make one for her. She loves turquoise and the beach theme appealed to her. The picture below is the result. I don't do a lot of chain and wire wrapping- it's hard on the hands and fingers, but I like the look of it.


I also just listed a new item on Etsy and my new 1000Markets store. 1000Markets is a new online arts and crafts store similar to Etsy. They are very choosy about who they let participate so you have to be juried in. I was sitting on pins and needles for 4 days waiting to hear! In the end it wasn't my product that was found wanting, but my lack of online computer saviness! (Is that a word?) Anyway, I'm happy to say that I have a store with them and look forward to selling my beaded art there. Check it out here: http://beadedextravagance.1000markets.com/

Back to my listing. The Tsarina's Necklace has taken me quite some time to finish. Not because it was so labor intensive, but because I was suffering "beader's block". I couldn't decide on a strap design, I went through several ideas for closures, then there was the problem with the dangles... but it all came together eventually. Please check it out in my Etsy or 1000Markets store but below is a preview picture of Tsarina's Necklace.

Last, but not least on my list, is my contest piece. I finally settled on the name and have decided to call it The Martian Queen's Necklace. I recently watched Ray Bradbury's Martian Chronicles and I guess I still had Mars on the brain when I came up with the concept for the piece. So far, I have spent 6 hours on it. I try to spend about 2 hours a day working on it. It will take me a while to complete it and I don't want to get burned out working on it too much. Besides that, I need time to work on my other commission piece and items for my stores too. (I've become very adept at this time management thing here lately!) This week I received the rest of the components I needed to start on the piece and started by planning and carefully measuring where all the cabs would be placed. O don't follow any scientific method, but my method seems to have worked because everything seems fairly symmetric...so far. We'll see how well I did once I start beading in the gaps.

Basically, I used a lined piece of paper and a ruler to line everything up. I used some heishi beads I'll be sewing on later as spacers and finally started the pain staking process of gluing the cabs to the Pellon. Yes, it was pain staking because I kept bumping my cabs out of there assigned spots! But, I finally got it done and then left them over night to cure.

The next day the fun started! I began by beading around the base of the center cab with copper lined crystal seed beads. Then I measured off where the brass stamp was going to be placed on the cab and continued to bead up in peyote stitch with 15/0 gold lined crystal beads. Around the base I added a circle of 4mm copper Swarovski crystals and beaded around the 2 smaller cabs next to the center cab. I also added the gold Freshwater Pearls and lastly, I glued the brass stamp to the cab and Pellon and let that cure overnight.

Then last night I began beading around 4 more of the cabs and I'll continue on like this until I have them all bezeled.


Sunday, March 15, 2009

What A Week!

Well, as far as beading new projects, I have one in the works but it keeps stalling. It's one of those projects that don't flow very well. I started the center piece about 2 months ago, then I had a block... if there's such a thing as 'beaders' block' I had it with this piece. I put it in my WIP drawer - Work In Progress- and forgot about it until last weekend when I was inspired to work on it a little more. Well, I'm almost finished with it and the clasp is giving me fits! I'll figure it out... eventually!

I haven't made any progress on my contest piece because I'm waiting on components that are supposed to arrive on Tuesday. So I'll be working on my other project until then.

Now for the great news! Last year I participated in a charity beading challenge for Beading For A Cure. One buys a kit of beads for $25.00. Everyone who participates gets the very same kit. There are certain rules that must be followed but the whole idea is to make something special and unique fro the beads in the kit. My entry for this years challenge I named Grecian Mosaic and it is up for auction on eBay this week. Please check it out and bid on it if you can. This is for a very good cause. The money from these auctions will go to the National Colorectal Cancer Research Association in honor of Layne Shilling, who lost her battle with colorectal cancer in November 2002. You can learn more about this cause at the Beading For A Cure website by clicking on this link: http://www.beadingforacure.org/about.html

Please check out my auction and others in this challenge. Here's the link to my auction:


Grecian Mosaic Cuff 2008 Beading For A Cure entry by Louisa Meece of Beaded Extravagance

Sunday, March 8, 2009

News from Beaded Extravagance!

Well, February has certainly been a busy month for me online. I am now a card carrying member of Facebook. I have two pages on Facebook, a business page for Beaded Extravagance and a personal page. My sister Elizabeth was kind enough to walk me through the 4 hour process of setting everything up - thank you Elizabeth! I have made several new friends and found a few old ones and also hooked up with overseas relatives. That has been great because I've had the chance to chat with them and reconnect. What a great concept Facebook is!

I have also posted a new item on Etsy and if you would like to check it out please use my Mini Etsy to get to my shop. I used my new favorite beadweaving stitch- Ndebele Herringbone- to complete this cuff. The pattern is of my own design.

I also joined the Etsy Beadweaving Team, a group of very talented bead artists who sell their work on Etsy. Check out their blogsite here: http://etsy-beadweavers.blogspot.com/
Now, onto the big stuff: I have started this year's FireMountain Gem contest piece. I have decided that I'm going to include my progress in this blog so hopefully you'll get to see new pictures of the progress I've made on the piece on a weekly basis. To kick things off I've included a couple of concept drawings and the first stage pictures of this piece. I have a name for it the piece but I don't know that the name I have chosen will be kept; I need to mull that one over a little more.

A concept drawing is just what it sounds like: it's an idea on paper of what you have in your head. The idea for this contest piece has been floating around in my head for quite some time now. It has gone through three revisions and the drawing in the photo is the one I will be beading. Now that doesn't mean that it will turn out exactly how I drew it when I start beading. It's more of a map to me but I don't always follow it that closely. Sometimes you just get inspired to wander off the path and try something different and if it doesn't work out, you can always rip out the stitches and start again.


The first step in making this piece was to dye the Pellon that I use as a base brown. I let that dry overnight and then glued my center cab down. Then I took the stamping that I chose to accent the cab and bent it to form around the cab. I haven't attached it to the cab yet because there is beading that I need to do around the base of the cab that I won't be able to access if I attach the stamping. And that's how far I've come with this. I changed my design and have to order more components so it will be a few days before I get to work on it again.

But in the mean time, I have two other projects that I will be working on. A bracelet order for my cousin Judy in South Africa and a beautiful commission piece for an Etsy customer, so I'll stay busy for the next few days- no problem there!